Essential Android App Security Techniques

Fortifying Your Fortress: Essential Android App Security Measures
Mobile applications have become an integral aspect of modern life. For Android developers, building an intuitive and feature-packed app is just one part of the process. Equally important is securing the application and the data it processes. Data breaches can compromise users’ private information, harm your brand’s reputation, and result in substantial financial losses. This article outlines essential security measures to help you strengthen the protection of your Android application.
Basic security
1. Applying ProGuard (and R8): Obfuscating Your Code
ProGuard (and its successor, R8, which is the default shrinker and obfuscator in Android Gradle Plugin 3.4.0+) is a tool that shrinks, optimizes, and obfuscates your Java and Kotlin code.
- Shrinking: Removes unused code, reducing app size.
- Optimization: Optimizes bytecode for better performance.
- Obfuscation: Changes class, field, and method names to short, random ones, so it’s way tougher for anyone to figure out how your app works if they try to reverse-engineer it.
Why it’s crucial?
- Deters Reverse Engineering: Makes it significantly more difficult for attackers to understand your app’s internal workings, locate security vulnerabilities, or steal proprietary algorithms.
- Reduces App Size: A smaller app is quicker to download and takes up less space on the user’s device.
How to Apply:
Enable it in your app’s build.gradle file:
android {
    buildTypes {
        release {
            minifyEnabled true // Enables code shrinking, obfuscation, and optimization
            proguardFiles getDefaultProguardFile('proguard-android-optimize.txt'), 'proguard-rules.pro'
        }
    }
}
You’ll need to configure proguard-rules.pro to specify which parts of your code should not be obfuscated or removed (e.g., classes accessed via reflection, native method names).
Effect:
Your compiled code becomes much harder to read if it is decompiled. For example, a class named UserDetailsHelper might become a.b.c.
2. Adding Firebase App Check: Protecting Your Backend
Firebase App Check helps protect your backend resources (such as Firebase Realtime Database, Cloud Firestore, Cloud Functions, and your custom backends) from abuse, including billing fraud or phishing, by ensuring that incoming requests originate from your authentic app and untampered devices. It uses app attestation providers (such as SafetyNet, Play Integrity API, or DeviceCheck on Apple platforms) to verify the authenticity.
Why it’s crucial?
- Prevents Unauthorized Access: Ensures only genuine instances of your app can access your backend resources.
- Mitigates Abuse: Reduces the risk of automated bots, malicious scripts, or modified app versions overwhelming or exploiting your backend services.
Implementation:
- Add the App Check SDK to your app.
- Configure app attestation providers (e.g., Play Integrity API).
- Enforce App Check on your backend services (Firebase or custom).
- Firebase Play integrity check
3. Using Cipher to Store Config Params on Gradle: Protecting Build-Time Secrets
Sometimes you need to store sensitive configuration parameters (e.g., API keys for third-party services, salt values) that are used during the build process or embedded into your app. Storing these directly in build.gradle or local.properties in plain text can be risky, especially if your code is version-controlled in a shared repository.
One approach is to encrypt these values and store the encrypted strings in your Gradle files. The decryption key can be provided via environment variables on the CI/CD server or a secure local mechanism, not committed to the repository.
Why it’s crucial?
- Prevents Accidental Leakage of Secrets: Avoids hardcoding sensitive keys directly into version-controlled files.
- Secure Configuration: Allows for safer management of build-time secrets.
Implementation:
- Encrypt your secret: Use a strong encryption algorithm (like AES) to encrypt your API key or config parameter. You’ll need a script or tool to do this.
SECRET_VALUE = “your_actual_api_key”
ENCRYPTED_SECRET = encrypt(SECRET_VALUE, YOUR_ENCRYPTION_KEY) - Store the encrypted value: Place ENCRYPTED_SECRET in your build.gradle or a properties file.
- Provide the decryption key securely:
- For CI/CD: Store YOUR_ENCRYPTION_KEY as a secret environment variable in your CI/CD system (e.g., GitHub Actions Secrets, Jenkins Credentials).
- For local builds: Store it in a local, non-versioned local.properties or as an environment variable.
- Decrypt at build time: In your build.gradle, read the encrypted value and the decryption key (from environment variables or local.properties) and decrypt it. Then, provide it to your app, for example, via buildConfigField.
// build.gradle (simplified example)
def apiKeyEncrypted = "U2FsdGVkX1+..." // Your encrypted API key

// In a real scenario, you'd fetch the decryption key from an environment variable
// or a secure, non-versioned local properties file.
// For demonstration, let's assume it's available.
// def decryptionKey = System.getenv("API_DECRYPTION_KEY") ?: project.properties["apiDecryptionKey"]

// String securedKeyDecrypted = decrypt(apiKeyEncrypted, decryptionKey) // Your decryption logic

android {
    defaultConfig {
        // buildConfigField "String", "SECURED_KEY", "\"${securedKeyDecrypted}\""
        // For demonstration, using the encrypted one directly (DO NOT DO THIS IN PRODUCTION)
        buildConfigField "String", "API_KEY_ENCRYPTED", "\"${apiKeyEncrypted}\"" // App would need to decrypt
    }
}
A more robust solution involves custom Gradle tasks or plugins to handle the encryption/decryption lifecycle securely. Libraries like gradle-cipher-plugin can also assist.
Note: The most secure way is often to avoid embedding keys in the app at all, and instead fetch them from a secure server at runtime, but this has its own complexities. If keys must be in the app, encrypting them in Gradle is a step towards better security than plain text.
Network Layer security
1. Using HTTPS Over HTTP: The First Line of Defense
Hypertext Transfer Protocol Secure (HTTPS) is the secure version of HTTP, the protocol over which data is sent between your browser (or app) and the website (or server) you are connected to. The ‘S’ at the end of HTTPS stands for ‘Secure’. It means all communications between your app and the server are encrypted. Using HTTP, on the other hand, sends data in plain text, making it vulnerable to interception and eavesdropping by attackers, especially on public Wi-Fi networks.
Why it’s crucial?
- Data Confidentiality: Protects sensitive user data like login credentials, personal information, and payment details from being read by unauthorized parties.
- Data Integrity: Ensures that the data sent between the app and the server is not altered in transit.
- Authentication: Confirms that the app is communicating with the actual server and not an imposter, reducing the risk of phishing attacks.
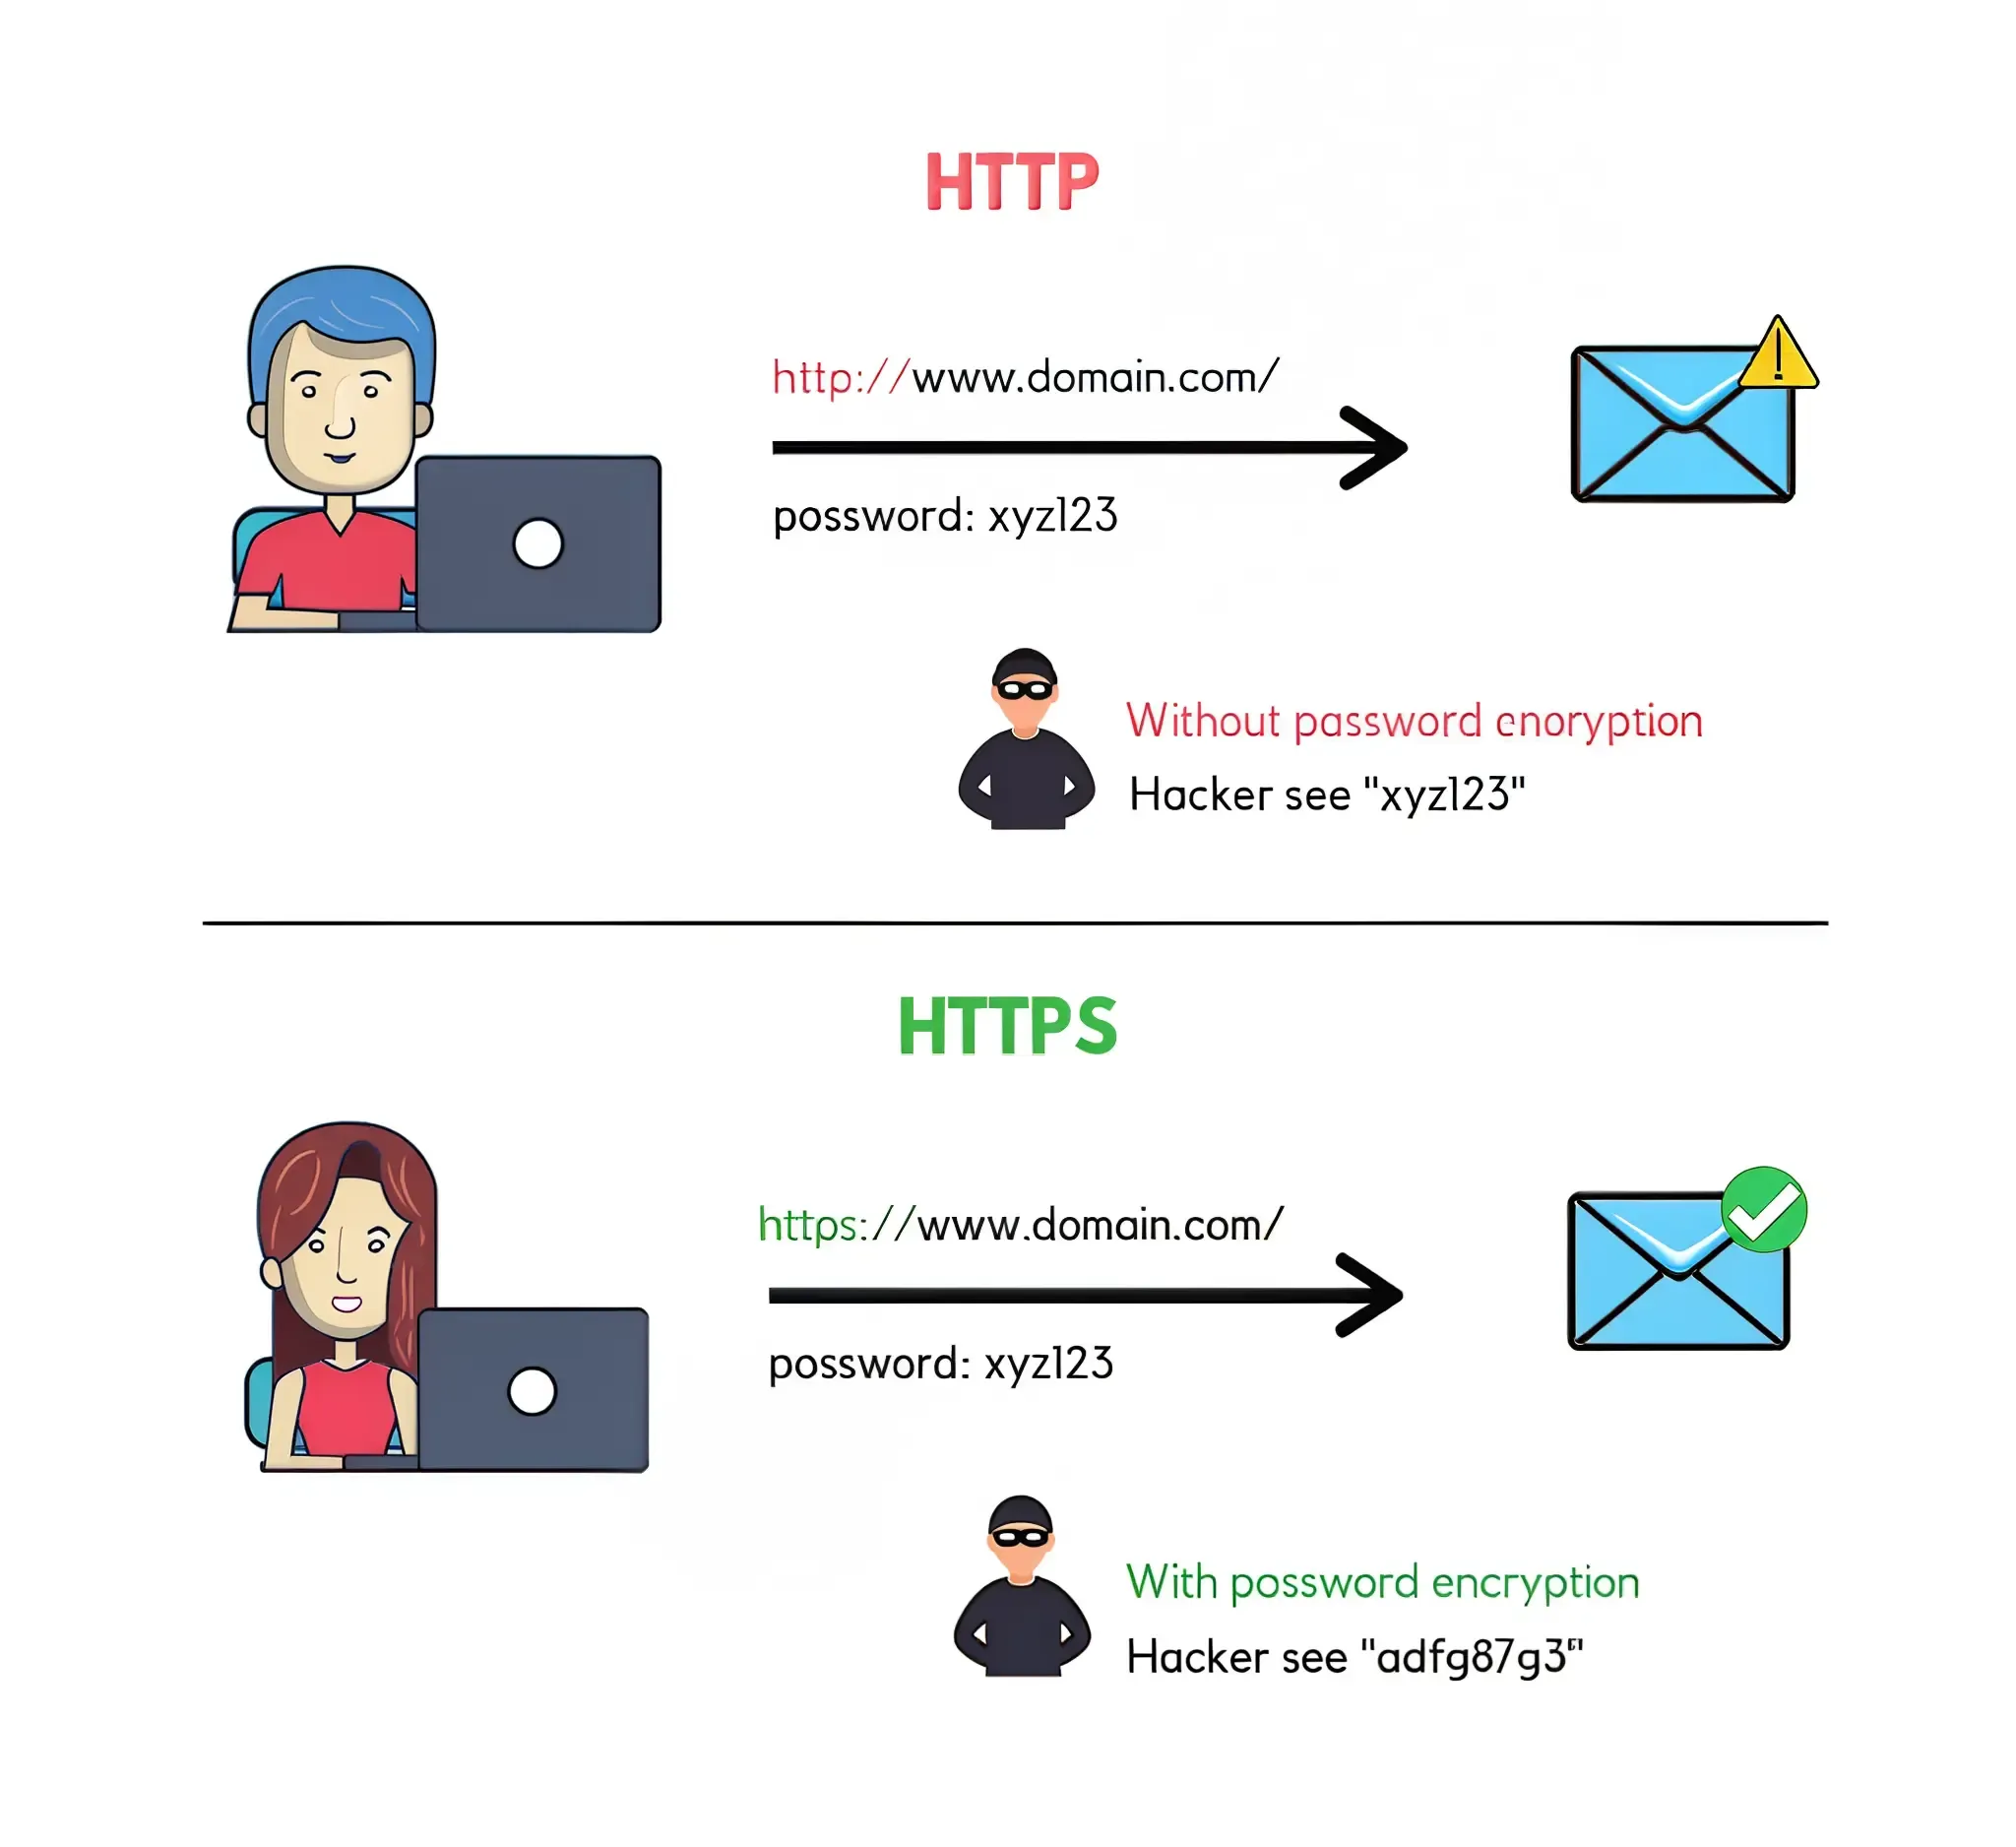
Reference: HTTP vs HTTPS
Implementation:
Ensure all your network calls to your backend servers use https:// URLs. Modern Android versions and libraries often enforce or strongly encourage HTTPS by default. Follow this tutorial to implement HTTPS using Retrofit
2. Adding SSL Pinning: Trusting Only Your Server
SSL-Pinning is a security mechanism where an application is set up, to recognize and trust only specific SSL certificates or public keys. Typically, apps depend on the device’s system to validate certificates through its trusted list of Certificate Authorities (CAs). In contrast, SSL Pinning hardcodes trust within the app for a particular server’s certificate or its public key, ensuring that the app connects only to that specific, authorized source.
Why it’s crucial?
- Prevents Man-in-the-Middle (MITM) Attacks: Even if an attacker manages to install a rogue root CA on the user’s device or compromises a CA, they cannot intercept HTTPS traffic because their certificate won’t match the pinned certificate/key.
- Enhanced Trust: Ensures your app communicates only with your legitimate backend server.
Implementation:
- You can implement SSL Pinning by bundling your server’s certificate(s) or public key hashes within your app and configuring your networking library (e.g., OkHttp) to validate against them.
- Obtain the public key for SSL certificate and add it to your network_security_config.xml with domain specific information
- SSL layer introduction
- How to add SSL pinning
- SSL pinning with certificate
3. Adding Encryption in API Calls (AES 128/256 and RSA): Layered Data Protection
While HTTPS encrypts the communication channel, encrypting the data payload itself before sending it provides an additional layer of security. This is known as end-to-end encryption if implemented correctly, or field-level/payload encryption.
-
AES (Advanced Encryption Standard): This is a symmetric encryption method, meaning the same key is used for both encrypting and decrypting data. Variants like AES-128 and AES-256 are highly secure and commonly applied to protect actual data content. It’s crucial to ensure the safe transfer of this symmetric key between the client application and the backend server.
-
RSA (Rivest-Shamir-Adleman): RSA is an asymmetric encryption technique that uses a pair of keys, one public for encryption and one private for decryption. It is frequently used to securely share symmetric keys (such as those used in AES) or to create digital signatures for authentication purposes.
Why it’s crucial?
- Defense in Depth: If the HTTPS layer is somehow compromised (e.g., due to a misconfigured server or a compromised certificate authority, though SSL Pinning helps here), the data itself remains encrypted.
- Protection on the Server: Even if an attacker gains access to the server logs or database where raw request data might be temporarily stored, the sensitive parts of the payload would be encrypted.
Implementation:
AES algorithm :
- Create an AES encryption key within the application.
- Use this key to secure the API request data through encryption.
- Transmit the encrypted data along with the AES key (also encrypted) to the server.
- The server retrieves the original data by decrypting it using the AES key.
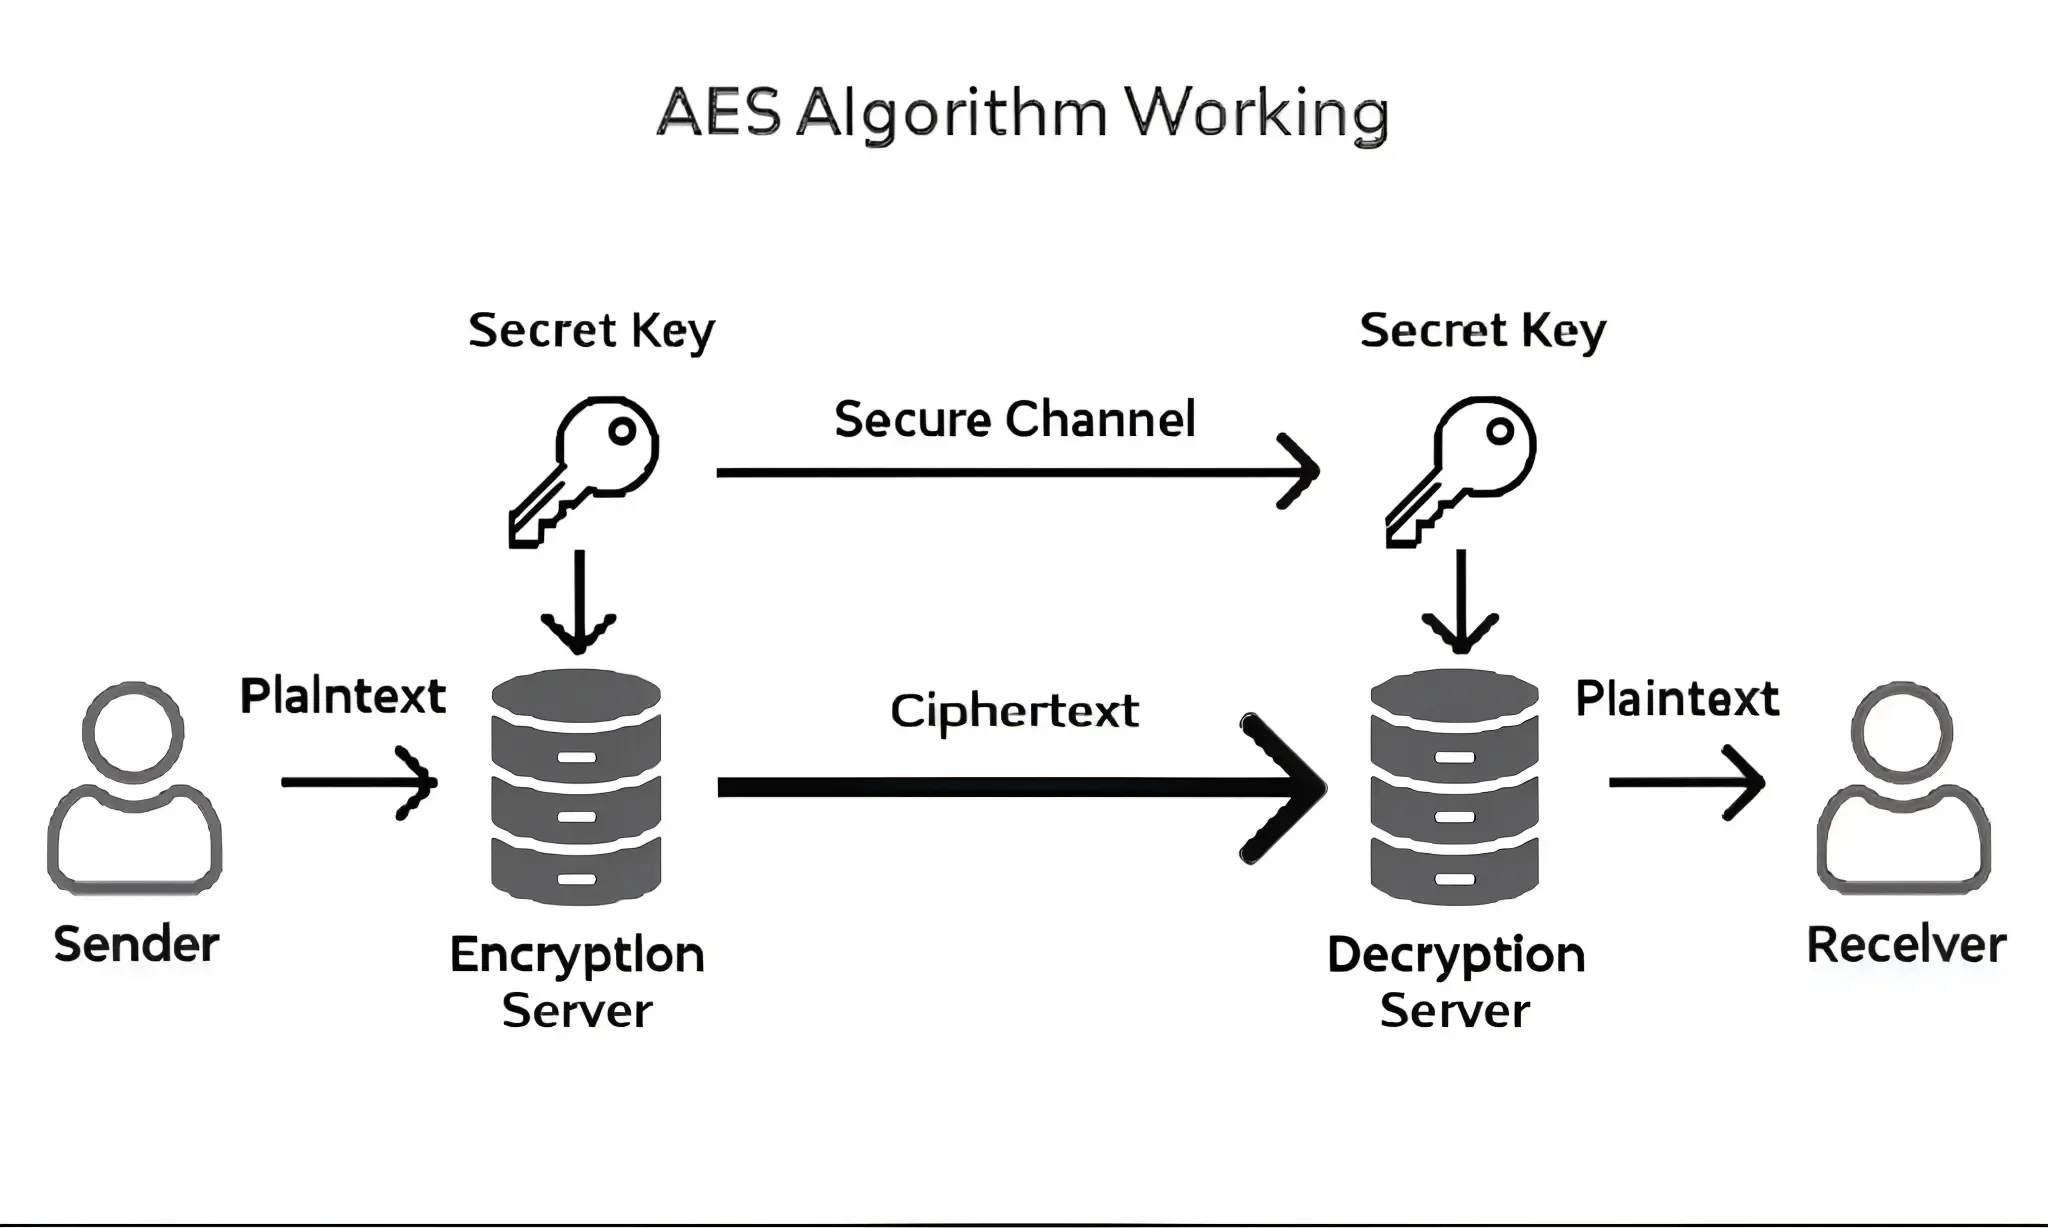
Reference : AES implementation
RSA Algorithm :
- Create an AES key within the application.
- Use this AES key to encrypt the API request data.
- Protect the AES key by encrypting it using the server’s RSA public key.
- Send the encrypted AES key along with the encrypted data to the server.
- On the server side, decrypt the AES key using its RSA private key, then use the decrypted AES key to unlock the request data. The same approach is used for processing responses.
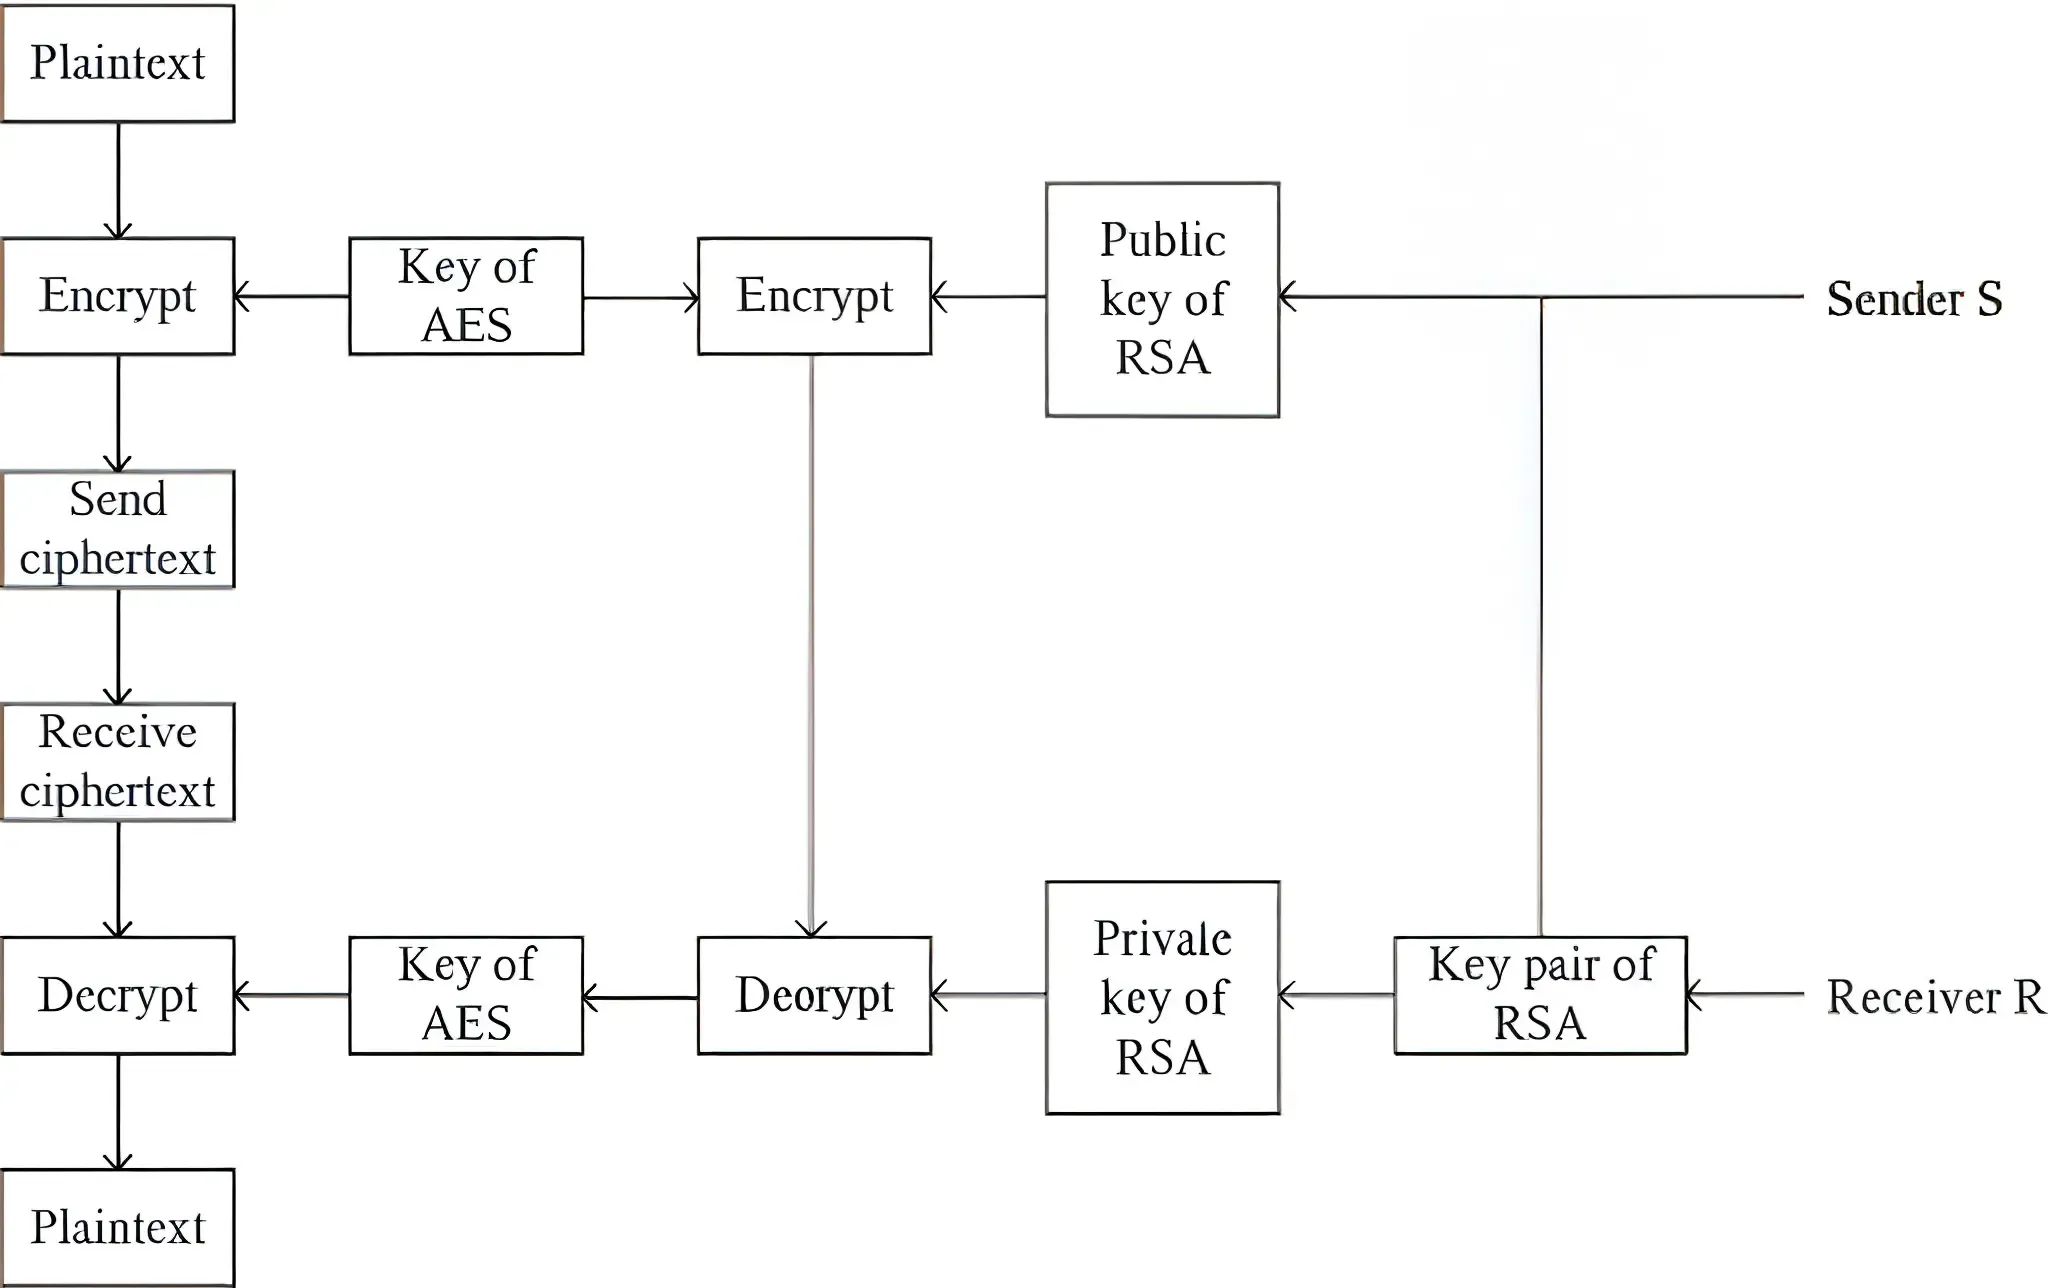 Reference : RSA algorithm working
Storage security
1. Storing Keys in Android Keystore: Safeguarding Your Secrets
The Android Keystore system lets you store cryptographic keys in a container to make it more difficult to extract them from the device. Once keys are in the keystore, they can be used for cryptographic operations but the key material itself is not exportable. This is a hardware-backed secure storage facility on most modern Android devices.
Why it’s crucial:
- Protection Against Key Theft: Prevents malicious apps or attackers with device access from easily stealing your app’s sensitive keys (e.g., API keys, encryption keys).
- Hardware-Backed Security: On devices with a Secure Element (SE) or Trusted Execution Environment (TEE), key material is protected at the hardware level, offering strong resistance against even OS-level compromises.
Implementation:
Use the KeyStore API to generate or import private keys and store them. Access to these keys can be restricted based on user authentication (e.g., fingerprint, PIN).
Follow these links to implement the same
2. Using DataStore to Store Preference Values: Modern Secure Storage
Jetpack DataStore is a modern data storage solution that enables saving either key-value pairs through Preferences DataStore or structured data using protocol buffers via Proto DataStore. It is intended as a replacement for SharedPreferences, providing benefits such as asynchronous access with Kotlin coroutines and Flow, improved error handling, and support for seamless data migration.
Why it’s crucial for security (when used correctly):
- Asynchronous Operations: Reduces the chance of blocking the UI thread, which can indirectly lead to security issues if not handled well.
- Transactional API (ProtoDataStore): Ensures data consistency throughout the application.
- Can be combined with encryption: While DataStore itself doesn’t encrypt by default, you can encrypt the data before writing it to DataStore and decrypt it after reading, using libraries like Tink or the Android Keystore for key management.
Implementation:
Use Preferences DataStore for simple key-value pairs. For more complex or typed data, Proto DataStore is recommended.
val Context.dataStore: DataStore<Preferences> by preferencesDataStore(name = "settings")

suspend fun saveUserAuthToken(context: Context, token: String) {
    context.dataStore.edit { settings ->
        val USER_AUTH_TOKEN = stringPreferencesKey("user_auth_token")
        // Encrypt authentication token here before saving if needed
        settings[USER_AUTH_TOKEN] = token
    }
}
3. Using Encrypted Shared Preferences for Legacy Needs: Securing Old Data
If your current application depends extensively on SharedPreferences and transitioning to DataStore isn’t practical right now, or you need a fast method to secure your existing SharedPreferences, you can use EncryptedSharedPreferences from AndroidX Security. This class acts as a wrapper around the regular SharedPreferences and ensures that both keys and values are encrypted automatically.
Why it’s crucial?
- Protects Sensitive Data at Rest: Encrypts data stored in SharedPreferences, making it unreadable if an attacker gains access to the app’s private storage on a rooted device.
- Easy to Integrate: Provides a familiar API, making it relatively simple to replace standard SharedPreferences.
Implementation:
- Include the AndroidX Security library as a dependency.
- Generate a MasterKey, ideally through the Android Keystore system.
- Use the MasterKey along with the name of your SharedPreferences file to initialize EncryptedSharedPreferences.
// Example for EncryptedSharedPreferences
val masterKey = MasterKey.Builder(context)
    .setKeyScheme(MasterKey.KeyScheme.AES256_GCM)
    .build()

val sharedPreferences = EncryptedSharedPreferences.create(
    context,
    "secret_shared_prefs",
    masterKey,
    EncryptedSharedPreferences.PrefKeyEncryptionScheme.AES256_SIV,
    EncryptedSharedPreferences.PrefValueEncryptionScheme.AES256_GCM
)

// Use sharedPreferences as you would regular SharedPreferences
sharedPreferences.edit().putString("user_secret", "my_super_secret_value").apply()
Conclusion: A Multi-Layered Approach
Securing an Android application is not about implementing a single solution but adopting a multi-layered defense strategy. Each measure discussed addresses different potential vulnerabilities. By diligently applying these practices, you can significantly enhance the security posture of your Android app, protect your users’ data, and build a trustworthy application. Stay updated with the latest security best practices, as the threat landscape is constantly evolving.